Thursday, December 30, 2010

Parsnip Puffs....

Reprisal of an old post for Terra who was wondering on her blog what to do with parsnips... 

~~~~~~~~~~~~~~~~~~~~~~


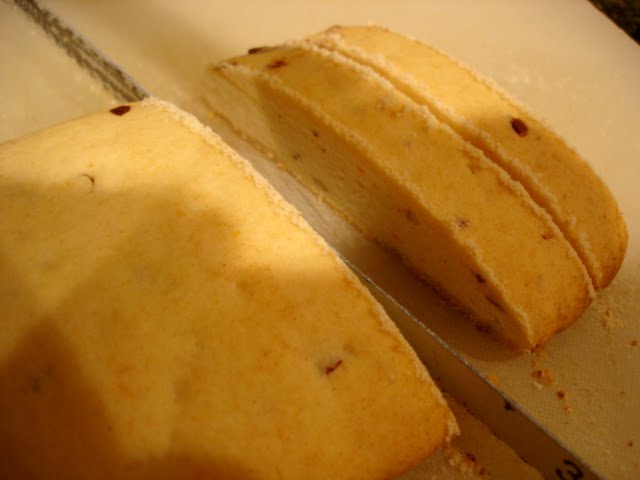
I had no idea how these would turn out... but.....they have been declared "a keeper" by Mr. BumbleVee...
Without further ado... may I present these tasty little parsnip puffs from the April issue of Recipes Only Magazine.... oh, and I guess I better admit.... it was April 1988 .... told ya I saved things...especially old recipes and mags with recipes in them. Every so often I drag out a handful and peruse...admire the beautiful food photography...and purge ...or not... this one gets to stay. It's a tiny little thing... 5 X 7.. more like a brochure..won't take up any space at all tucked in with my cookbooks.

This is the recipe straight from the book...but, don't forget... all recipes are meant to be toyed with.... I used Apple Jelly as I had some home made from a friend on hand... and I halved the recipe as I only had a pound of parsnips... ...


Parsnip Currant Puffs

2 lbs. parsnips
2 eggs, separated
1/2 tsp. ground ginger
salt and pepper
3 TBSP red curant jelly

Peel parsnips, cut into about 6 pieces each and cook, covered, in a small amount of boiling salted water for 10 minutes or until soft. Drain well in a sieve. Place in food processor (in batches if necessary) and puree.
Add egg yolks, ginger and salt and pepper to taste. Process until light and fluffy. (Recipe can be prepared ahead to this point, covered and refrigerated up to 1 day. Bring to room temperature before proceeding.)
In medium bowl, whip egg whites until stiff but still moist. Fold into parsnip mixture.
Divide most of the mixture amongst 8 buttered (6oz./175ml) custard cups or individual souffle dishes.
Make well in each, spoon in one eighth of the jelly and cover with remaining parsnip mixture, smoothing the top. Place filled dishes in shallow pan with boiling water halfway up sides of dishes.
Bake in preheated 325 F (160) oven about 20 minutes or until slightly puffed and set on top. Serve immediately.


I didn't bother with a food processor... I cut them in small pieces.. boiled them.. they mashed up nicely ... I even saved the lovely parsnip-y water with all the nutrients in it.   I freeze all water I ever boil a veggie in.. and save it for soups.... you can't believe how much flavour it adds..not to mention nutrition.


I just filled each ramekin half full.. placed a big flat dollop of the Apple Jelly .. and then filled the ramekin with more parsnip mixture.


I served the ramekin right on the plate... it was still pretty hot... but, we were careful... peas, couscous and leftover chicken got a new lease on life with this interesting and pretty little side ....

Tuesday, December 21, 2010

Cookies from a Christmas past....


Chocolate-Covered Cherry Cookies  


These intrigued me a few years ago and now have become a tradition at our house.  Absolutely perfect for Valentine's Day too.
They are simple, if a little fiddly, and look pretty darn amazing if I do say so myself...and I do.  


Thank goodness I had an extra set of hands to help with them ... it is killer on the shoulder blades to sit and put the little bit of chocolate dough around 51 cherries!


... and .... he does such a great job too!


Even the smallest foil cups still seem a bit large to me ... I suppose I could put a bit more dough around each one... making them fill it. Or... squeeze it onto the dough a bit before baking. 


but.... they still look pretty special.


Wonder if it might help to leave a few out for Santa?


Chocolate Covered Cherry Cookies

2 10 oz. jars maraschino cherries with stems
2 tbsp. cherry brandy or maraschino cherry juice
1/2 cup butter or margarine
1 cup sugar
1/2 cup unsweetened cocoa powder
1/4 tsp baking soda
1/4 tsp baking powder
1 egg
1 1/2 cups all purpose flour

Drain cherries, reserving juice. Lightly toss cherries with brandy if using...and drain. Let stand for 20 minutes.
Beat butter or margarine in a large mixing bowl with electric mixer for 30 seconds. Add sugar, cocoa powder, baking soda, and baking powder; beat til combined. Beat in egg and 1 teaspoon of the reserved liquid. Beat in as much flour as you can with the mixer. Stir in any remaining flour with a wooden spoon.
Shape a scant 1 teaspoon of dough around each cherry. Place each ball in a 1 inch foil or paper bake cup. Place cups 1 inch apart on ungreased baking sheet.
Bake in 350F oven for 10 minutes or til tops look dry. Transfer cookies to wire racks. Frost warm cookies with about 1/2 tsp frosting. (I waited til they were very cool... not enough energy... they worked very well cooled.) Makes 48 (I ended up with 51)

Chocolate Cherry Frosting
Stir together 1/2 cup semisweet chocolate pieces and 1/3 cup sweetened condensed milk in a small heavy saucepan. (I had a bowl in water in the pan..worked perfectly) Cook over low heat just til chocolate is melted, stirring occasionally. Sir in 1 to 2 tablespoons of reserved cherry liquid to make of spreading consistency. Makes plenty.

Thursday, December 16, 2010

Nuts !!!

Literally... and figuratively .....

When a recipe says roast nuts in a 350F oven for 15 minutes...and alarm bells go off??.... listen to your alarms!

This is where the first batch ended up...


If it looks like a garbage can... that's because it is.
Walnut halves are like gold.  A big bag was $14.99....on sale.  Oooooooooohhh.... that burns me almost as much as it did the darn nuts.

I was going along so well too.... this is how amazing they were just after I added a splash of my real Quebec Maple Syrup from a friend of a relative.... just brought all the way across the country.  Wasted Maple Syrup is an absolute crime!!  Anybody who has ever had the real thing will tell you that. Then...a generous grinding of lovely black pepper.  These are spicy glazed nuts. Mmmm... well, they would have been mmmm...


... but, then... the recipe called for putting them in the oven.  So.. I set my timer for 12 minutes..not even the required 15... but... too late..... they were already past tasting burned when I grabbed for the baking sheet.  There were some "french words" as somebody used to say..... who was that now?  I forget.  Anyway.....it was disheartening to say the least because it was just the beginning of my plan for an amazing salad for supper.

Onward.... second batch.  Never quit when you are behind.

You can bet your bottom hard earned dollar that I was watching like a hawk this time around..... my eyes were glued to that oven.  Don't even walk out of the kitchen.... cuz you know how fast nuts can be ruined!

Ahhhhhh.... that's more like it.  I had the oven at just over 300F this time...and it only took about 6 to 8 minutes really.... ....


Then....I poached my lovely pear.  In wine and cinnamon infused syrup....

It was a thing of beauty.... well....to my eyes at least it was.  It stayed firm... soaked up the wonderful flavours...and was absolutely the nicest pear I have ever seen or eaten.  Including the creation by the chef at the restaurant where I first had this salad... and now... I've copied it to the best of my recollection.


Pear and Goat Cheese Salad with Glazed Walnuts......

I used some peppered goat cheese and instead of just crumbling on the bits...I wanted to figure out a way to cut the soft cheese into rounds.  Looked on Google...and found a few suggestions.  Love Google.

Dental floss.  Yep.  You can saw it across it if you like...as in the video I saw... but, if you just lay it under the roll of cheese...then draw up each side of the floss and cross them over each other...it slices straight through the cheese as easy as can be.   Even very thin slices come away so cleanly it is amazing. I did put the cheese roll in the freezer for just a few minutes (watch that too... you don't want to ruin a lovely little log of cheese) .. so that I could cut away the packaging without damaging the roll.  Why can't they make it easier to get the roll of cheese neatly out of the packaging material?

A vinaigrette with a few tablespoons of the poaching syrup finished it off. YUM....

Take that Chef Kevin....

Sunday, December 5, 2010

Chocolate Cake in a Ramekin

Yesterday Mr. BV was searching around the kitchen... hoping for some tasty morsel.  But...the eggnog cookies were all gone... no biscotti in the jar and even the freezer was bereft of muffins.  I felt sorry for him....so while he watched a period of hockey I whipped up a little chocolate goody.  He was totally surprised and it was fun to see the smile....


Originally it was called 5 Minute Chocolate Cake. ...and, it's usually made in a mug in the microwave.  But, when another blogger made it she changed things a bit... using butter instead of oil and also, divvy-ed it up between 2 ramekins and baked in the oven instead of the microwave.  Much better.  It's just like real cake when baked...not the rubbery microwave version.


I'm giving you the original recipe......but you, too, can change it up anyway you like.  Next time I think I'll even add some toasted nuts.  A person could really go crazy and toss in a caramel chocolate and have some gooey goodness in the middle.  It's such a cute little taste of yummy cake ... and, who really needs a huge cake when just a few mouthfuls will do the trick when you just HAFTA have some chocolate?


These are a bit deeper ramekins that I needed...but, I just bought these new little chocolate coloured babies and wanted to use them.  I have a "thing" for ramekins....I have a drawer full of them.  All sizes, shapes and colours..... love the little guys!

5 Minute Chocolate Cake In A Mug

4  TBSP flour
4  TBSP sugar
2  TBSP cocoa
1  egg
3  TBSP milk
3  TBSP oil  (I used melted butter)
3  TBSP chocolate chips (optional..I used less)
small splash of vanilla extract
1 large coffee mug (MICRO wave safe!)

Add dry ingredients to mug and mix well.  Add the egg and mix thoroughly.  Pour in the milk and oil and mix well.  Add the chocolate chips (if using) and vanilla extract and mix again.
Put your mug in the microwave and cook for 3 minutes at 1000 watts.  The cake will rise over the top of the mug, but don't be alarmed!  Allow to cool a little, and tip out onto a plate if desired.  Makes 1-2 servings.

OPTION::  I smeared a bit of butter in two ramekins (they do tip out easier if you want to serve them on a plate... perhaps with a spoonful of ice cream?) and divided the mixture between the two of them.  I also substituted butter for the oil.  Bake in the oven at 350F (180C).. for about 20 to 25 minutes.  Watch them carefully... don't want to burn chocolate!  The tops will begin to crack when nearly done...and I just checked with a toothpick at about 18 minutes..... when it comes out clean...they are done.   Unless you happen to put the pick into a chocolate chip or morsel...then just check in another spot... and enjoy!

Thursday, November 18, 2010

Ranch bread...

I got the recipe from Carson's 7MSN Ranch... so I'm calling it Ranch Bread when I write up the very simple recipe.

She blogged about it here ...and here . I made some the other day along with several of her followers.  I kind of snickered when some of them mentioned making mistakes...because really, it is so simple, who could do that? Check there for the actual ingredients and measurements as well as her "how to"...

Well...I made a little boo boo too that could have been soooo much worse than it was. Thankfully I like to watch any of my breads for the first few minutes.  You know ...just because it's such fun to see how it begins to rise immediately.  Thank goodness I did peek in there... because I left plastic wrap on the dough!!  Aacckkk!!. what a stupid thing to do!


I whipped open the oven door and tore off the wrap... taking some dough with it and leaving a few little peaks on top of one loaf.  Who cares?  I was just happy it didn't melt totally and burn and make a helluva mess.  The oven was at 425 F....methinks it soon would've been a major disaster.

This bread is an easy no knead loaf... and like all good rustic, artisan loaves ..has lots of lovely air pockets.... it's supposed to.

One day....mix up the ingredients.... cover it with that dreaded plastic wrap...and leave it for about 18 - 24 hours on your counter top.  I was a bit worried that perhaps my bowl was a bit small..but, no..it stopped at a few inches from the top.


next day it looks like this..... lots of tiny air bubbles... and quite sticky...


Gently scrape it out of the bowl onto a well floured surface... and, as Linda says... lift it skyward with a spatula a few times.  Gently form it into a loaf with hands well floured... or two smaller ones...and let it rest while the oven is heating.  Here was where I caused my own problem...I put that stupid plastic wrap back on top of my loaves while they were resting, and then... didn't even notice it and slid the loaves into the oven.  DON'T DO THAT.
As Mr. BV said...why didn't you use a tea towel like you do all the other times with bread? At least you would have noticed that.
D'uuhhh .... who knows? ...


See my little spiky thingies? ... caused from ripping off the plastic wrap.


Here's the perfect one.


and.... even more perfect hot with butter melting on a slice.... MMMMMMMMM......

Saturday, November 13, 2010

Easy Stuffed Peppers

I had some leftover rice...a mix of white, brown and wild... two leftover chicken thighs...and...

I spied a red pepper in the crisper.


Okay then...stuffed peppers it is.

Gently saute some finely diced carrots.  I like to do them in a bit of butter to give them flavour.   As soon as they begin to soften... add onions, celery and anything else you like to add to your mix to make it interesting.  This day I had some broccoli and I like to chop the stems into any dish to give us more veggies... so, in went a bit of broccoli stem.  I don't leave the vegetables too long as I like mine a bit crunchy.  Adjust your own cooking time as you like.  All of this should go very quickly.

Just before I added the rice, I minced a clove of garlic and stirred that in as well.  I don't like to leave my garlic to cook too long either .. or worse, to burn ... it gets bitter tasting then.....

Add the leftover rice immediately ... stir it all together well and drizzle on some Sesame Oil...it imparts a wonderful flavour and I love the aroma...you don't need much... just enough to make it tantalizing.  I added some broccoli tops (sometimes I add peas or beans) and tossed in the chopped chicken, a few chunks of pepper, a crushed chili pepper and a spoonful of tinned tomatoes.  Stir and leave just a bit longer to warm it all through.


Cut pepper in half... rub oil along the cut edges with a finger to prevent drying out and burning.  Mound the rice mixture into the pepper halves... smear a bit of oil on bottom of baking pan and place pepper halves into it.

Bake at about 350 for 20 to 25 minutes....


If you like... sprinkle on some grated cheddar and mozzarella at the end of 20 minutes or so.. bake a bit longer...then turn oven to broil and bronze the top.  Beautiful.
Mm..... whoops... no photo of the completed dish!  Acckkk!!  It looked so wonderful too...but, we got carried away admiring and eating .. and can't believe I didn't think to capture it for posterity!  Maybe next time.   This weekend.... cabbage rolls.......

Wednesday, November 3, 2010

I've been abroad....

..... ahahha.... oh, yerh...... sure I have.

Just messing with your head. Of course I'm fibbing.  It was just summertime.  All I could manage was one blog and some golf and gardening and playing about.... we don't have long summers up here.... so we make the most of it.

The fall has actally been better than some of the summer months...it is beautiful, warm, dry and we are having lovely blue sky days.  If I hadn't had surgery on my wrist I would have got in a great last month of golf.  The courses are closed now for the winter months... somehow I have to keep in shape to be able to swing a club by spring... but that is easier said than done with a foot that is now bad.... sigh.. it's been a few bad weeks...

This is what happened to my baking prior to the wrist surgery...

Even with greasing and flouring the pans... disaster!


The only good thing was... it tasted very yummy...

Italian Plum Loaf.  You may remember it from last year.  Only enough plums for two loaves and this had to happen.  Darn it.

But... this is already in the stores...


Oh....sorry.....


Here's the English version....

And... here's the perfect bottom of a perfect Eggnog Loaf !!


Aren't glass loaf pans wonderful?!  I'm saving the others for bread.  They seem to do bread loaves just fine....


Bread doesn't stick... why on earth did the plum loaves do so poorly I wonder...


Wednesday, August 4, 2010

Chocolate Mocha Cake


We have a little tradition.  Mr. BV bakes me a carrot cake for my birthday.... and for his...I bake a chocolate.  Our birthdays are too close together (in days, not years) ...for us to have two cakes in a week....so we usually do somebody's in the proper week....and the second several months later.

I try different chocolate recipes every year... but, he must stick to his now "famous" carrot cake that I love....

This was the one I made a few months ago for his special day.  It's from my ancient "Canadian Cook Book".

Chocolate Mocha Cake

2/3  cup shortening (I used butter)
1  1/4  cups sugar
2  eggs
1  tsp vanilla
2  cups sifted pastry flour .. or ..
1  3/4  cups sifted all purpose flour
1/3  cup cocoa
1  tsp baking powder
1/2  tsp baking soda
1/4  tsp salt
1/2  cup strong coffee (cooled)
2/3  cup sour milk, or buttermilk (to make sour milk just add a few tsps lemon juice or vinegar to milk and let sit a bit)

(The recipe says to stir cocoa and coffee til smooth and cool...then to blend it into the fat sugar egg mixture, but I prefer to add my cocoa to a bit of the flour and stir it into the butter mixture) ..

Cream shortening; add sugar gradually, beating after each addition til fluffy. (proper emulsifying of fat and dissolving of sugar is essential to fine textured cake.)

Add vanilla; beat well.  Add room temperature eggs one at a time beating well after each egg.

Add milk and flour alternately to the fat-sugar mixture, 1/4 each time, beginning and ending with flour.  It is a drop batter and should be thin.

Bake at 350F in a greased 8 inch square pan or two 8 inch layer pans.  You can line with waxed paper if you like.  I usually just lightly grease my pans and dust on a bit of cocoa.  Works the same as flour...but doesn't leave a white residue on the sides of the cake.

Layer cakes will bake in about 30 minutes and square cakes in about 50.  Check for doneness with a toothpick.... if it comes out clean they are done.   I usually test a bit early for chocolate cakes because you definitely don't want to take a chance.  The recipe talks about browning...but, hey...it's tough to tell when chocolate is browning and it can burn too easily.

Cool 10 minutes, run a knife around the sides and place rack on top of pan.  Turn over and your lovely cake should pop right out onto the rack.  If you papered... gently peel off the paper.

Mocha Butter Icing

3 to 5 tablespoons butter
2  cups icing sugar (approximate)
3  tablespoons strong cold coffee... or sift 1/2 tablespoon instant coffee with sugar.
1 to 1 1/2 tablespoons of cocoa ... or just enough to give a light chocolate colour to icing.  Or, melt 1/2 to 1 square of unsweetened chocolate and stir into creamed butter.

For my coffee, I made some strong coffee with instant and cooled it.  Then...added as needed to get proper consistency.  If you want less coffee flavour you can use a bit of milk as well as a tiny bit of coffee.

Sift the cocoa with some of the sugar.
Cream butter with 2 tablespoons sugar; add some liquid gradually.
Sift in remaining sugar to make it thick enough to spread.

I always have my handy dandy tasting spoons nearby too..... when it tastes right to me...it's perfect to spread onto the cakes.  If I make layers...I want some to spread between the layers as well..... if you only make the square you can make a bit less icing.

This one's for you Shashi....I hope you like it.  The print friendly "thingy" below is great.  Click on it...then move your cursor over the recipe...deleting anything I yak about that is not pertinent... then print out the part you need to bake the cake.  I'm too long winded....hahahha......

Friday, July 23, 2010

Biscotti Toscani


I'll write out the recipe later.... I see part of it is obliterated by some glare..


My favourite cutter for biscotti?  A hacksaw.... which I keep in the kitchen.  No piping is cut with this one.... just cookies... makes a nice clean cut.

Wednesday, June 16, 2010

Weeks have passed.....


I've been busy...honest I have.  Baking each week as usual....suppers as usual... I cook every day.  Just keep putting off posting til I do something else and all of sudden it is midnight and then...I think I'll do it in the morning...which I don't because that's when I read your blogs...and then..it's noon and then...well...you see what happens.

These were yesterday's strawberry scones.  I made them for my garbage guys.  Yep....I bribe them.  This is what they took away with smiles on their faces.  I told them straight out that I was bribing them as well as saying thank you for always taking everything I put out there.  They said "bribes are good" .... and cheerfully loaded up the 5 bags of grass, leaves and shrub clippings...as well as 5 twined 4 foot long bundles of Nanking bush ...  an old length of garden hose and a complete, full grown, dead spirea shrub.   I love my guys....  they treat me well.

However, one of them did mention they wondered why they hadn't seen me for some time.... to which I said..uh, oh.... I must be falling behind on the muffin quota.  Sorry...I'll attend to that straight away.... so, two weeks in a row they've had warm from the oven goodies.  Next week, if it is not raining... I don't know...they could be out of luck, I may be out golfing....finally.  But, yesterday they picked up two more houses after ours..turned the corner and parked the huge truck in front of my neighbour's ...and proceeded to have their coffee and fresh scones.  Hahahahha.... that did make me laugh.   Doesn't take much to amuse me.... it made my day.

Thanks guys!!  I love ya...


Next week.... double chocolate chunk cookies....


Sunday, May 9, 2010

Pork Tenderloin with Creamy Cider-Herb Sauce

The tenderloin recipe that I mentioned on the day that I gave you the yummy Brussels Sprouts recipe?.
 ... here it is....

I didn't have any cider around... and, if you are in the same boat.... don't let that hold you back.  I used some apple juice and added a splash of vinegar.


Pork Tenderloin with Creamy Cider-Herb Sauce
2 pork tenderloins  (about 2 lb/1kg total)
1/4  tsp each salt and pepper
1  TBSP vegetable oil
1  TBSP butter
1/2   cup finely diced onion
1  clove garlic, mince
1/2  cup each apple cider and sodium-reduced chicken broth
1/4  cup whipping cream  (you know I didn't use this! hahah... some whole milk will do, but add it near  
       the end after boiling the broth for a bit)
1  tsp Dijon mustard
1  tsp cornstarch
1  TBSP each minced fresh thyme and parsley (I didn't use that much and also added a bit of fresh            
       rosemary and sweet basil)

Sprinkle pork with salt and pepper.  In large oven proof skillet, heat oil over med-high heat;  sear pork all over, about 6 minutes.

Transfer to 400F / 200C oven; roast til juices run clear when pierced and just a hint of pink remains inside about 15 minutes.  Transfer to cutting board and tent with foil; let stand for 5 minutes before slicing.

Meanwhile, in same skillet, melt butter over medium heat; cook onion, stirring occasionally, until softened, about 5 minutes.  Add garlic; cook 1 minute.

Add cider and bring to boil, scraping up any brown bits.  Stir chicken broth, cream and mustard; boil until reduced to 1 cup, about 5 minutes.

Mix cornstarch with 2 tsp. water and stir into sauce along with thyme and parsley; cook, stirring, until slightly thickened, about 1 minute.   Serve with pork


~~~~~~~~~~~~~~~~~~~~~~~~~~~~~~~~~~~~~~~~~~~~~~~~~~~~~~~~~~~~~~~~~~~~~
NB:: I couldn't see the sense of putting the skillet into the oven and waiting to do the sauce.  I put the tenderloins in a heated baking dish which was already waiting for them in the oven instead..and then just began making the sauce in the pan in which I browned the meat.  Make sure you take the pork out of the oven almost a bit earlier than you think because remember it is still cooking a bit more while tented and you don't want to overcook it.

We sliced it and poured the sauce over to serve.... 

Saturday, May 1, 2010

Orange Pumpkin Loaf

I did just stop for tea... and had a lovely slice of pumpkin loaf.  They call this a Tea Bread.... but, honestly?  a loaf describes it more accurately to me... as in my head I always think of bread as being of the yeasty variety.  But, that's just me.

It is from the Company's Coming Muffins and More book... by Jean Pare.  I've made lots of the muffins and loaves in her book.... all tasty...


File this under any name you like.... although I'll print it out here as what they call it in the book.  The orange goes so well with the pumpkin.

Pumpkin Tea Bread

1/2   cup butter
1 1/2   cups granulated sugar
2  eggs
1   cup canned pumpkin
1   tbsp. grated rind of orange
1/4   cup orange juice
2 1/4   cups all purpose flour
1/2   tsp. baking powder
2   tsp.  baking soda  (I never put as much as they say... your call)
1/2   tsp. salt  (I never put any, the butter already has plenty for me)
1/2   tsp. cinnamon  (use more.... it benefits from a bit more in the spice department)
1/2   tsp. cloves
1/2   cup chopped nuts  (I use toasted walnuts)
1/2   cup chopped dates  (or raisins) ....

optional:::  I like to also add some ground ginger, a sprinkle of all spice instead of the cloves and a tiny sprink of nutmeg...

Cream butter, sugar and 1 egg.  Beat in second egg unti smooth.  Mix in pumpkin, rind and juice.

In another bowl, measure and stir well all remaining ingredients.  Pour all at once into batter in mixing bowl.  Stir only enough to moisten.  Pour into greased loaf pan 9 x 5 x 3.

Bake at 350 F (180 C) for about 1 hour or until an inserted toothpick comes out clean.  Cool in pan 10 minutes.  Remove loaf from pan to rack.  Cool and wrap.

This loaf tastes even better the second and third day....


Sunday, April 11, 2010

Spinach quesadillas


Safeway has the cutest little cards of recipes... in the produce section and also in the meat area.  I always look through them and sometimes there are several that I bring home.  This one definitely caught my eye.  I had lots of fun making them...and may I just say?...  simple, tasty and, oh, no.... even pretty healthy too... a winning combination!  Keep that card and file it!!  Change things up any way you like.


Spinach and Black Bean Quesadillas

1   TBSP olive oil
1   small onion diced
3 to 4 cups fresh pre-washed spinach
4   8 or 10 inch flour tortillas
2   cups shredded cheese (the recipe calls for Mexican blend whatever that is) (I used mozza and cheddar)
1  15 oz. can black beans, rinsed and drained
1   tsp. ground cumin (optional)

Heat oil in large skillet over medium heat.  Add onion; cook and stir until soft.  Add spinach; cook and stir until wilted.  Season with salt and pepper to taste.  Drain well; set aside.

Coat large skillet with cooking spray and cook a tortilla til golden brown; turn over.  Top with one-fourth  of the cheese, beans and spinach; season with cumin if desired.  Fold tortilla in half pressing gently; cook 2 minutes per side or til lightly browned and cheese melts.  Remove from skillet; keep warm.

Repeat with remaining tortillas and filling.  Cut each quesadilla into 3 wedges and serve.


((I added chicken and also did things a bit differently because it seemed easier.  I used only one pan for everything))

 Cooked some chicken thighs in a non stick pan. Then, I added cumin to the chicken thighs which I also seasoned with basil and some red pepper flakes (add any other spices you like).  Removed chicken from the pan, cooled and sliced it while softening the onions (I added a teensy bit of oil and about a tsp. of butter) and some yellow pepper slices in the same pan... added the spinach and a clove of minced garlic.  Wilted it slightly, quickly gave it a stir and removed it to a platter.  Then began browning a tortilla in the same pan ... and followed directions for filling and browning.

Next time I think I'll try them with refried beans with green chilis.... nice and spicy...

Wednesday, March 24, 2010

Brussels Sprouts

Yes....they originally were popular in Belgium...hence the name.  A lot of folks don't care for them...I love them.  If you overcook sprouts, they release a sulphurous odor ... which is one of the reasons some people don't care for them.

This recipe is for raw sprouts.  I prefer them at least slightly cooked myself because they are sometimes a bit strong or bitter to me if raw. But... still love 'em ... however, I do sometimes wish we could all taste fruit and veggies directly from the vine..(or tree or whatever) ... at the peak of freshness and perfectly sun ripened.  If wishes were horses, as they say.......

Okay, back to this particular recipe.


I watch a new cooking show called Best Recipes Ever ... they have a ton of great recipes available online... called "tested til perfect".  Find them at canadianliving.com


Shredded Brussels Sprout Salad

3  tbsp. light mayonnaise
2  tbsp. grated parmesan cheese
1  tbsp. lemon juice
1  tsp. each Dijon mustard and Anchovy paste ( I omitted the Anchovy paste)
1  large clove garlic, minced
1/2  tsp. Worcestershire sauce
pinch pepper
4 cups (1 L ) shredded Brussels sprouts (about 16 sprouts)  (she used food processor to shred them)
2  tbsp. each extra virgin olive oil and diced prosciutto or bacon (who needs oil when you have bacon fat? ..hmmm...)

In large bowl, whisk together mayonnaise, cheese, lemon juice, mustard, anchovy paste, garlic, Worcestershire sauce and pepper.  Add brussels sprouts, tossing to coat. Set aside.

In skillet, heat oil over medium heat; cook prosciutto until crisp.  (I used bacon and no oil of course)  Add prosciutto with oil to sprouts mixture, tossing to combine.  Let stand for 10 minutes to wilt slightly.
~~~~~~~~~~~~~~~~~~~~~~~~~~~~~~~~~~~~~~~~~~~~~~~~~~~~~~~~~~~

Other option::::    I chose to cut my sprouts in halves and quarters, and toss them into my pan with some slices of almost cooked bacon. Once softened a bit...I turned off heat and added the mayo mixture ...folding into the sprouts.  Served it in the nice stainless pan in which I cooked the bacon.  Next time I think I will blanch or ever so slightly cook the sprouts first... ooooohhh.... it's a yummy dish.
Creamy mashed potatoes, carrots in broth with fresh parsley....tenderloin with Apple cider ...


Of course, not necessarily one to make every time you enjoy sprouts...but, for special occasions.  Or... even as what I call "Sunday on a Monday" as I decided we were having the other day.  I didn't do much for supper on the Sunday because the day just got away from me.  So, figured, what the heck... I'll do something nice on Monday.  I'm home all day.... and with tenderloin as the main dish..it sure doesn't take long to turn out something pretty special....stay tuned for the tenderloin recipe.

Wednesday, March 17, 2010

Art Smith's Peach Cobbler

Well, actually.... the only reason I call it that is because I watched Top Chef Masters a few weeks ago and he was on as a contestant.  One of the things he was doing was a tiny version of Peach Cobbler... rolling out some light dough with a miniature rolling pin.... and he used the teeniest little ramekins with a handle.... it was pretty cute because he has huge hands and it made everything look even more miniscule.  The judges were suitably impressed with the cuteness of it as well.


I don't have a clue what he put into it... they don't tell you and you don't get to see all of the preparation...

But, .. I had to give one a try even though it was a guessing game.  I tried to find his recipes on line... no luck at all.  Too much advertising to go through to get anywhere with that.  I gave up.

No fresh peaches around here at this time of year, so I used some canned in pear juice.  Butter the ramekins.   I added a bit of cornstarch to my juice and tossed in a few blueberries.  I thought it would add to the dish as I have seen recipes before that had peaches and blueberries, but, honestly, it makes the peaches a horrible deep purplish colour and ..well....it just didn't look that great to me.  Next time...just peaches.


I was already mixing up some sweet tea biscuit dough for an apple cobbler, so just swiped a little blob...added a bit of flour to it.. and floured the countertop and rolled out a piece.  I sprinkled a bit of sugar on top as well..to counter the adding of flour. Don't want dry tasteless tops on my cobbler!

Baked them til lovely and golden and voila... Peach Cobbler.  So cute.  The perfect snack for Mr. BV and me when he came home from work....


Then.... we had supper.  Hahahah.... yes, indeed,  always have dessert first.  That's my motto.